In this article, we'll walk through the process of onboarding your entity for Traction Payroll.
This article only applies if you are using the Traction Payroll product.
Please contact Traction Success (1-888-466-6080 or success@tractionag.com) to schedule a time to walk through the onboarding process.
To proceed with onboarding, please have the following information available:
- EIN of the Entity you are onboarding
- State Tax ID
- State Unemployment ID
- Bank Account and Routing information for the account you will draw wages from
- The same bank account you will use to draw wages must also be setup as an account inside Traction
- Your Wage Expenses account in your Chart of Accounts
1. Navigate to the Entities page
- Click on the Launcher 9-pin
- Select Dashboard
- Select Step 1 (Set up your entities)
- You may need to expand the Let's get started! panel
- Click the green setup button
Alternatively, you can jump directly there by going to https://app.tractionag.com/dashboard/setup/entities

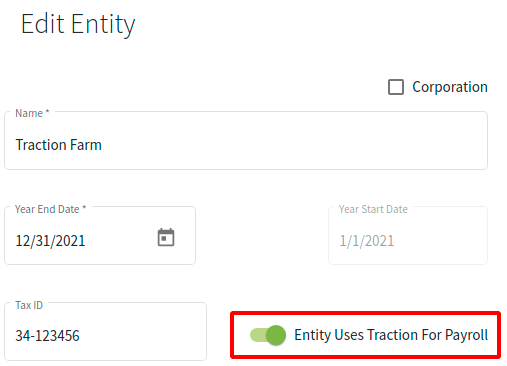
2. Update the Entity
- Click on the Entity that contains the Chart of Accounts that you want to associate with your payroll activity
- Click the Edit icon
- Toggle the Entity Uses Traction For Payroll
- Click the Save button to keep this change.
3. Begin to onboard your entity
- Select your entity from the drop down
- Click the Manage Employer button

4. Employer Onboarding
- A new screen will open
- Click on the Onboard Employer

5. Employer Setup
- Enter in your information
- Click Save & Close

6. Setup Bank Information
Traction is collaborating with Zeal to provide process the payroll information. For the next steps you will be walked through the remaining setup in their system.
- Fill in your Account Number and Routing Number for the bank account you will be drawing from for your payroll
- Verify those numbers
- Click Submit
We will now need to wait until the micro-deposits show up in your bank account. This can take up to three days.
Once they are available, return to the Payroll Dashboard to enter those two amounts and continue setting up your entity.

7. Sign Paperwork
- Review each of the forms presented by clicking the View link
- Once you have reviewed and are ready to agree, check the box corresponding to the respective form
- Add your digital signature to the Draw Signature box at the top of the page
- Click Save
- Once you have supplied your signature and approval for each of the documents, you are ready to click Complete Registration
- Be patient after you click the Complete Registration, it can take a few moments. DO NOT CLOSE THIS TAB.
- You will return to the Traction application when it is complete.

8. Employer Information
Next we will need to select the Payroll Bank Account and the Payroll Expense Category Accounts.
These accounts should already be available in your account. If not, you can add them in-line while you are setting up your Employer Information.
- Select the appropriate account for your
- Payroll Bank Account
- Wage Expense
- Review the information
- Click Save & Close

9. Completed Employer Setup
You will be returned to your Employee Information page, with the warnings about the Entity we just setup being cleared.

We are now ready to add Employees.