Note: Traction Plus at a minimum is required for this feature. Visit our Plans and Pricing page to learn more. To view the inventory balances on the accrual balance sheet, you must own Traction Pro.
Jump to a Section
1. Click on the Dashboard and select Accounting. Next, select the proper account in the Account Register. Then click on the Add New button and select Add New Payment.

Depending on the type of inventory adjustment you need to make, please choose the appropriate scenario below:
- Scenario A: Scenario A: Adding an Initial Supply Inventory to Traction
Please note that with Scenario A, there are 2 methods in adding input inventory without impacting your financials. Users can use this method to enter initial inventory or navigate to Resources > Inputs to enter an Opening Balance as an alternative. If you are new to Traction and looking to enter an Opening Balance to Inputs, please visit this knowledge base article for further instructions. - Scenario B: Transferring the Current Crop Year's Supply Inventories in Traction to the Next Crop Year
Scenario A: Adding an Initial Supply Inventory to Traction
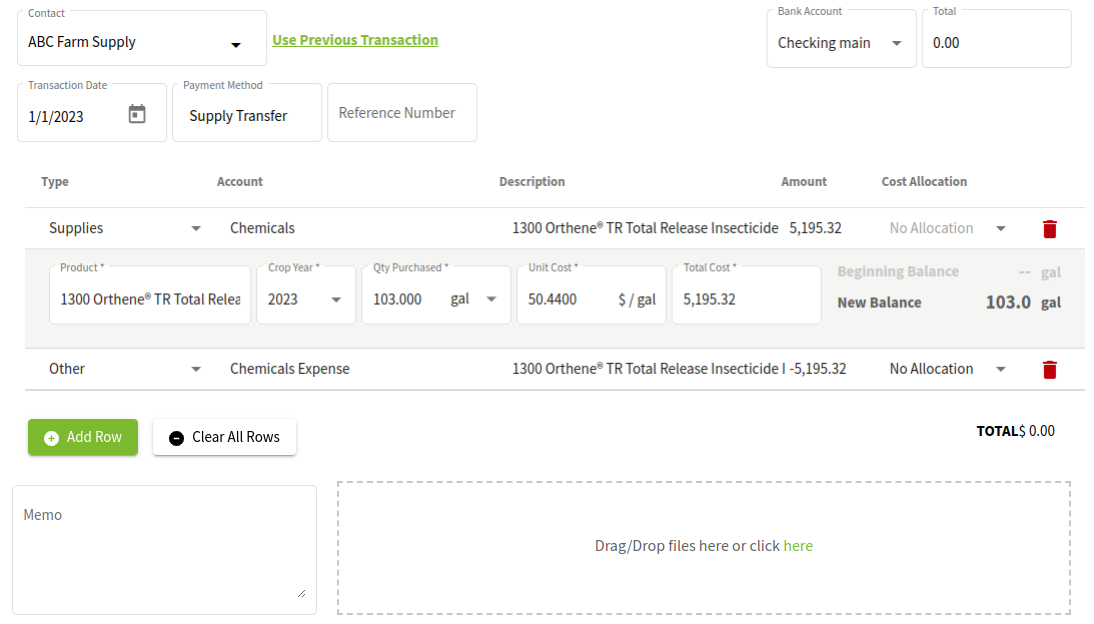
2A. This transaction is for users who do not already have an inventory in Traction and need to create one based on the supplies they have on hand.
Transaction Date: Enter January 1st for the appropriate Crop Year.
One line will be a Supplies purchase for the particular input. In our case, we are adding 103 gallons of 1300 Orthene for our 2023 Crop Year.
The second line will be an Other transaction for the same Expense account. In this example, we will use Chemicals Expense. The amount will be a negative of the dollar amount in the Supplies purchase line. This will offset the expense and add the supply to your initial inventory for this year.
Scenario B: Transferring the Current Crop Year's Supply Inventories in Traction to the Next Crop Year
Updated Process for 2024
Under Field Operations, navigate to Inputs, and select the Carry Over button in the bottom right.

All of your Inputs (Chemical, Fertilizer, Seed) that currently have an inventory will be listed.
1. Select the Crop Year you are transferring inventory from.
2. Enter a memo to be included for this transfer.
3. Choose which inputs you want to include in the transfer. By default, all Inputs are selected.
4. Make any adjustment to the Carry Over Unit Cost for each Input.
5. Review your work and then click the Apply Carry Over to initiate the transfer.

You will receive a confirmation regarding the Carry Over Inventory, stating the years and how many inputs you are including.

You will then be asked if you want to update the cost of the inputs, as well as any field records for the selected crop year, related to the selected inputs.

After you have answered both questions, the Carry Over transfer will be complete. The transfer will be marked in each year's inventory for the inputs.
Source Year

Destination Year

If you made an error with one of the Inputs, you can delete the transfer for that individual input, allowing you to initiate a new transfer for that particular input.
